{
    "shader-constants": {
      "MAX_LIGHTS": 8
    },
        "defaults": {
            "version": "v1.0",
            "defaultWindowWidth": 1920,
            "defaultWindowHeight": 1080,

            "size": 256,
            "gridScale": 2.0,
            "heightScale": 80.0,
            "scale": 15.0,
            "octaves": 8,
            "persistence":0.5,
            "lacunarity": 2.0,

            "sphereStacks": 20,
            "sphereSlices": 20,

            "torusRingSegments": 40,
            "torusTubeSegments": 20,
            "torusRingRadius": 1.0,
            "torusTubeRadius": 0.3,

            "FOVdeg": 45.0,
            "nearPlane": 0.1,
            "farPlane": 10000.0,
            "sensitivity": 100.0,
            "speed": 1.0,
            "speedMultiplier": 50.0,

            "transformSpeed": 0.1
        },
        "loggers": {
            "stdInfo": {
                "hasTimeStamp": true,
                "colour": "INFO_COLOUR",
                "type": "INFO",
                "level": 0
            },
            "stdWarn": {
                "hasTimeStamp": true,
                "colour": "WARNING_COLOUR",
                "type": "WARNING",
                "level": 1
            },
            "stdError": {
                "hasTimeStamp": true,
                "colour": "ERROR_COLOUR",
                "type": "ERROR",
                "level": 2
            }
        }
}
Welcome to the L-SIM ENGINE Documentation
Up to date for: v1.0 | current version: v1.0
About the Project
The L-SIM Engine is an open-source game engine made in C++ using OpenGL. The engine aims to be a bloat-free yet capable engine designed with procedural generation and programmers in mind. The engine also aims to reduce long loading times and avoid having to deal with unintuitive systems.
Information about progress and features of the L-SIM ENGINE can be found on the GitHub repo's README.
Getting Started
To begin using the L-SIM Engine first download the latest version containing both the executable and source code (v1.0 as of writing this) . Now while you can technically load the engine at this point; I would advise not to. This is because it will use the engine directory as the working directory which will lead to every project's files being in the same place. Instead, you should download the L-SIM Launcher then set the main working directory and finally use the add project button to create a new project in that directory. This in turn will lead to every project being in its own directory in the main working directory.
EDITOR'S NOTE: Ensure that your main working directory is not a directory containing any non-L-SIM projects. Otherwise, these directories will still appear when selecting a project to load making it harder to find what you are looking for.
EXTRA INFO: For a directory to work as an L-SIM project it must–at least–include a resources directory (for textures) and a Scripts directory for scripts.
A shaders directory containing a default.vert default.frag, default.geom, and instance.vert which can most easily be found in the L-SIM Engine repo or L-SIM Launcher repo.
Finally, you need a config directory containing a config.json for engine defaults which can be found in the repos previously listed.
Fixing Launcher Issues
When you load a project there is a non-zero chance that something could go wrong. Whether it is your fault or ours, issues can and most likely will eventually occur. Here I will cover 2 of the most common errors that occur whilst launching the L-SIM Engine.
1. Shader Misconfiguration
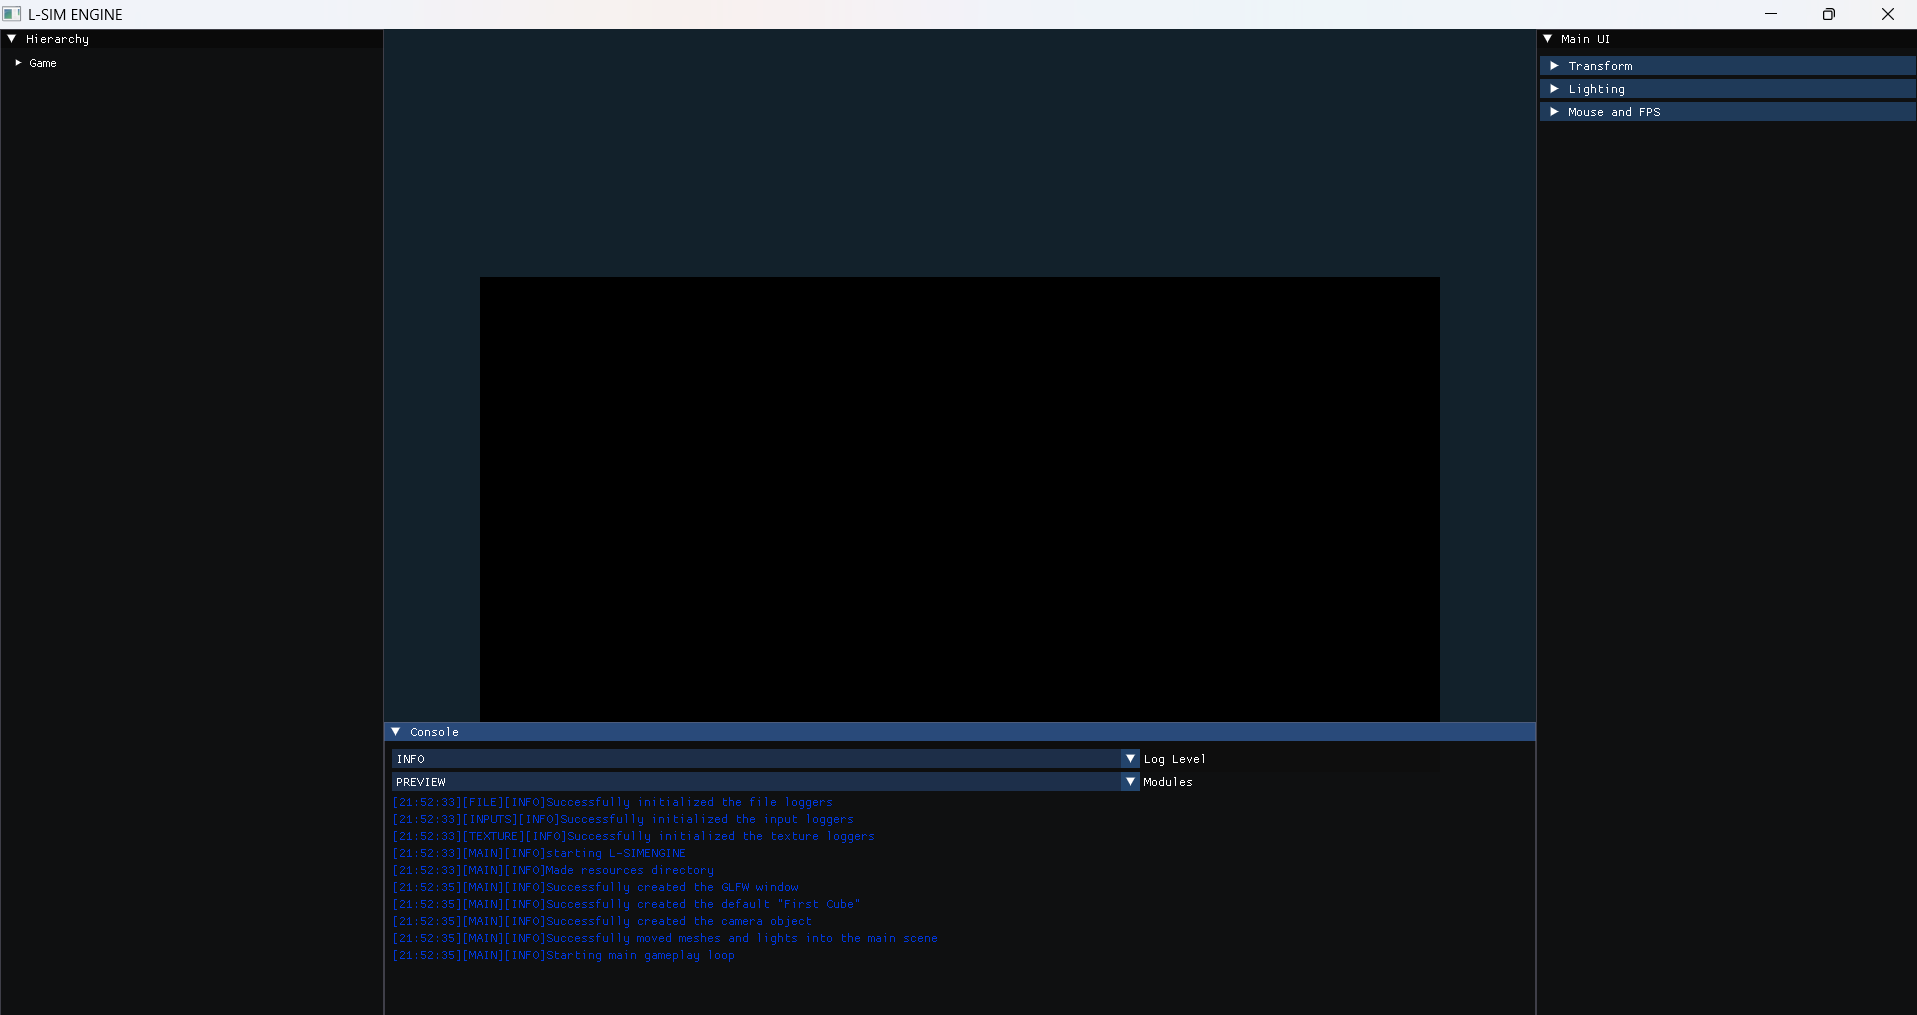
Upon loading into the project, one of the most common errors you may see is an unmoving black rectangle where the cube should be. This is caused by a shader misconfiguration where the shaders fail to load. Luckily, fixing this issue is simple. All you have to do is:
- Ensure that all three shaders exist these being:
default.vert,default.frag, anddefault.geom - Make sure they are error free and include all fields
After checking these the issue should go away.
PHOTO SHOWCASING MENTIONED ISSUE
2. Config Misconfiguration
This issue is very similar in nature but instead of being an issue with shaders is an issue with the config. Unlike a shader misconfiguration, a config misconfiguration will crash.
So how do I know if it's a config issue?
Telling if the crash was caused by a config misconfiguration is actually quite straightforward.
This is because there will be a distinct error message (shown in the photo further down).
To fix this issue simply ensure that all required fields exist inside your config.json.
PHOTO SHOWCASING MENTIONED ERROR MESSAGE

What to do if the issue is not caused by me?
If the issue isn't caused by you and was not caused due to requirements not being met by your device. Remember this is a Windows-only project as of writing this. The best course of action is to create an issue on the L-SIM Engine repo especially if the issue is one of the two mentioned above.
EDITORS NOTE: While there is technically the chance of getting an error because of an issue with the resources directory it is far less common, as in order for resources to work there just has to be a resources directory in the project.
Even though it is still worth checking if you are having an error when loading textures.
The Basics
Welcome to the basics sections. In this section you will learn how to:
- Move around the game engine
- Transform objects (Position, Rotation, Scale)
- Create and delete meshes and lights
- Adding textures, specular maps, and normal maps
- Saving and Loading projects
Learning these core concepts will allow you to create functional 3D scenes that meet the needs of your project.
Moving Around
Upon loading into the engine, the first thing you will want to do is move around. Fortunately this is very simple. To move around the scene you use W, A, S, and D. This will allow you to move on the XZ plane. To move up and down use space and ctrl respectively. To look around simply hold left and move the mouse. Most of the previously mentioned information was pretty obvious and common among most 3D software, but there are two other movement controls worth mentioning related to speed. Firstly, if you want to move around faster holding shift increases the speed of the camera to twice the default amount. Finally, if you are still not pleased with the speed using the scroll-wheel will allow you to adjust the speed further.
Transforming Meshes and Lights
While moving around a scene is cool it is basically useless if you can't move meshes and lights as well. To begin, first ensure that the transformation gui is open. Then you have to select the current mesh, at the moment because there is only one mesh we can enter 0. Alternatively we can press [ or ] to move select the previous or next mesh, and because there is only 1 mesh it will go to 0. Now to move meshes and lights you can use the arrow keys in conjunction with page up and page down. At the moment this will cause the meshes to move around. To get the meshes to rotate instead press R on the keyboard for scale press N and to get back to movement press G. I find it easy to remember this like so:
- Govement
- Rotation
- Ncale
Alternatively or for more precise control you can use the gui itself. Note that for scale you will currently see Uniform scale which scales all axes evenly. To scale axes independently you must first uncheck the box then it behaves the same as position and rotation.
Now if you instead want to move a light you must first press L for light mode then you can move the light in the same way as the mesh. To get back to mesh mode press M.
EDITORS NOTE: Currently you can only move lights and thus rotation and scale are not supported. However, new types of lights in progress for upcoming versions.
Creating and Deleting Meshes and Lights
Now that you are able to move the camera, meshes, and lights around you will probably be wondering how you can create and delete objects. Luckily, that is the very topic we will cover here. To add a new mesh, first ensure you are in mesh mode (M). then simply pressing F will add a new mesh. This mesh will be automatically selected so you can begin transforming it right away. On the other hand, to delete a mesh simply press DEL and the mesh one position down will be selected. The same logic applies for lights as well although, you can only have a max of 8 lights in a scene by default (we will go over how to change this later).
What if I want a different mesh type?
If you want to change the mesh that will be spawned you can change it in the dropdown in the transformations panel. Currently, the engine offers 6 standard mesh types from 0 to 5.
- Cube (Cube is selected by default)
- Plane (A plane is a flat surface with no depth)
- Pyramid
- Sphere
- Torus (A torus is a donut-like shape)
- Terrain (Terrain is procedurally generated and is generated with a texture)
EDITORS NOTE: To more efficiently change between mesh types you can use 0-5 on the keyboard.
EXTRA INFORMATION:*
All logic for generating these primitives (apart from terrain which can be found in terrain.cpp) can be found in primitives.cpp
Textures
With the skills you have learnt about so far, you should feel comfortable enough to create simple scenes.
Now while this is exciting, a game where every object is the exact same colour and texture doesn't make for a very good game.
Luckily, the L-SIM Engine makes adding textures extremely simple.
To begin select the mesh you want to add a texture to. Then selected the useTexture checkbox to tell the engine that you want to use a texture for this mesh.
Your mesh should now turn black, don't worry this is normal and expected. You should now also see 3 new fields Add Texture, Add Specular Map, and Add Normal Map.
All three of these function the same:
- First click on the add button. This will open a file dialog.
- Next select the file you want.
- Then you are done.
If everything went well you should see your texture on the mesh.
What if I want to use a flat colour?
To use a flat colour:
- uncheck
useTexture - Navigate to the
Mesh Coloursetting. - select your chosen colour.
- Done.
This is one of the beauties of the L-SIM Engine, to add textures and colours, unlike some other engines—which may have to navigate through complex UI, in L-SIM it's as simple as pressing three buttons.
How can I change light settings?
When it comes to light, we have already discussed creating, deleting, and moving lights, but have not yet discussed other features. In L-SIM as of v1.0 lights have 3 properties: Position (which we have already discussed), Light Colour, and Attenuation. To edit these first open the Light Settings panel, then these options will become visible. While it should be obvious what light colour does, attenuation is a bit more unclear, but simple put, Attenuation is the range of the light thus a high attenuation value will result in a light with a greater radius.
EDITOR'S NOTE: Attenuation is not the intensity of the light, but instead the radius. This means a higher attenuation value will not make the light brighter on pixels already inside the radius.
EXTRA INFORMATION (on the different map types):
As of v1.0 the L-SIM Engine supports 2 types of maps on meshes, these being specular maps and normal maps. Both of these maps are extremely common in the 3D space, but I will describe them incase you don't know what they do.
1. Specular Maps
Specular maps are responsible for the shiny/reflective effect on meshes. Specular maps are often use on metallic parts of meshes and glossy surfaces. A specular map is a black and white image where whiter parts reflect more light.
EXAMPLE OF SPECULAR MAP FOR WOOD PLANKS
 Credit: Texture by @samuliak on medium
2. Normal Maps
Normal maps are responsible for adding surface details to textures based on light direction. This is not shadows from others meshes but are shadows caused by the texture. Normal maps are often used in textures with crevasses such as brick walls, tiled floors or wooden panels. Normals maps are textures with a distinct purple colour where X is a red colour, Y is a green colour and Z is a blue colour. The purple colour is the most common as most normals will face outwards with \(Z \approx 1\) while normals near gaps will be more red or green as they face along the XY plane.
EXAMPLE OF NORMAL MAP FOR A BRICK WALL
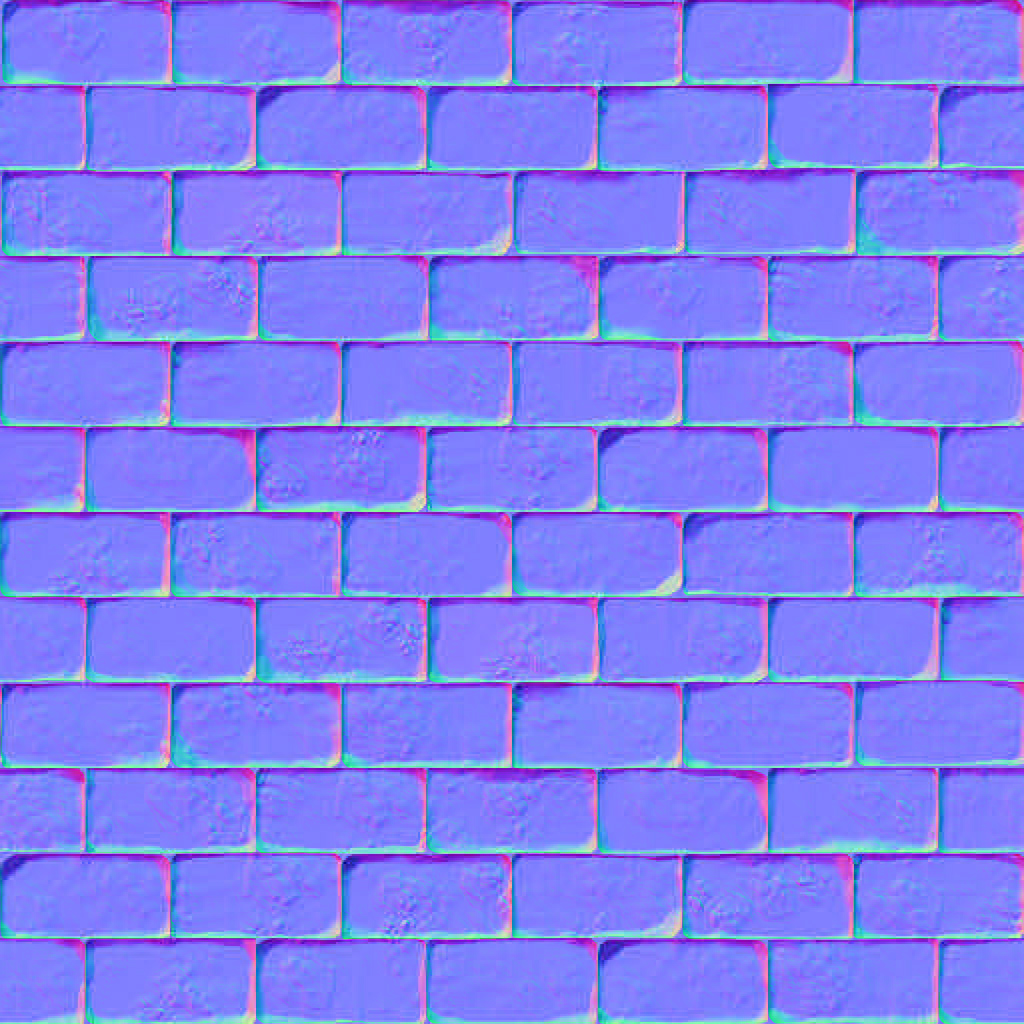
Credit: Texture from Learn OpenGL
ANOTHER EDITOR'S NOTE: It is actually possible to apply a normal map, and or a specular map to a flat colour mesh. To do this:
- first select
useTexture - Add your desired maps
- Deselect
useTexture - The mesh should still now have the maps
This technique can be useful to add extra detail to solid colour meshes.
Also, if you ever want to remove a map you can select useTexture then click on remove map for the maps you want gone.
EXTRA INFORMATION (about file storage):
When you and a texture or map, the file is stored inside the resources directory, this is turn means that you can delete the original texture from downloads or where ever it was stored.
This also means as of v1.0 you cannot organize files inside of resources (as the engine won't be able to find them) although we hope that eventually that the resources directory will automatically sort files by use.
Saving and Loading Projects
Once you have crafted your perfect scene you will need to save it. Fortunately, like most things in L-SIM, saving and loading is relatively simple.
To save your project press O for output. This will cause a file dialog to open where you can select the place you want to save your project.
In most cases we recommend saving the project in the project directory generated by the L-SIM Launcher or yourself.
Currently, although subject to change, by default when you save the file extension .lsim is not automatically added. Ensure that your file name ends with .lsim
Now upon reopening the project so long as your .lsim file is in the project root the L-SIM engine should automatically find and load your file.
What if I want to load a place not in the project root?
Loading a project not in the project root is also very simple. This time instead of pressing O press I for input.
Another file dialog will then open allowing you to select your .lsim project.
Please note that when loading a .lsim file it will try to use textures from the resources directory of the current project.
This means that you should ensure that inside your current project you have all the resources needed by your project as well as ths default config and shader files.
EDITOR'S NOTE:
As of v1.0, the textures generated by terrain meshes are not saved or loaded so we recommend for now—although terrains are very cool—to refrain from using them in projects until the issue is resolved, which hopefully will be in the next version.
EXTRA INFORMATION: You can learn more about how fileIO works in the going further section.
Going Further
Now that you have mastered the basics you should feel confident in making any scene that your heart desires (within the capabilities of the engine). In this section we will talk about:
- Config files (how to use them and how they work)
- How the logging system works
- how fileIO works This will give you a better understanding of what is happening behind the scenes and how you can modify the engine to meet your needs.
Working With Configs
After mastering the basics the next thing you should learn is how configs work.
In L-SIM every project has its own config file.
We use config or more generally .json files to avoid the need to rebuild the project every time we adjust a value.
A config in L-SIM is a single .json file (as of v1.0) that contains information regarding engine defaults.
Here we will take a look at a config.json and how we can modify it to meet our needs.
Below is the default config file that we will be working from
Click to see the full defaults config
Now if you have worked with before this should be about all you need to get started.
However, if you have not used or even seen a .json file before don't worry, by the end of this page you should have a good enough understanding to work with config files in L-SIM and even use them in other applications.
Every .json file begins with { and ends with }. Between these 2 braces are a set of key-value pairs and arrays.
Working from the top down the L-SIM config.json file has 3 keys in the first layer.
Let's take a look at these.
{
  "shader-constants": {},
  "defaults" : {},
  "loggers" :  {}
}
In L-SIM the 3 keys in the first layer are shader-constants, defaults, and loggers.
Let's start by taking a look at shader-constants as it is the simplest.
{
  "shader-constants": {
    "MAX_LIGHTS": 8
  }
}
The shader-constants key contains one other key MAX_LIGHTS with a value of 8.
If you had tried to create more than 8 lights, you would have noticed that the engine wouldn't let you.
This is because of the MAX_LIGHTS key being set to 8.
If you want you can now try to change it to a different value such as 16 or 4.
Keep in mind that the larger this value the slower the engine will run, although this shouldn't be noticeable so long as the number is not insanely high.
If you want you can also try adding another key-value pair. In this example we will add a DEFAULT_COLOUR.
{
  "shader-constants": {
    "MAX_LIGHTS": 8,
    "DEFAULT_RED": 1,
    "DEFAULT_GREEN": 0,
    "DEFAULT_BLUE": 0
  }
}
As of v1.0 we have to add every value separately, but hopefully in newer versions syntax like DEFAULT_COLOUR: "vec4(1, 0, 0, 1)" will be supported.
How that we have our new fields we need to use them in our default.frag in the shaders directory.
default.frag is the fragment shader which handles the colour of every pixel (fragment) on the screen.
Which is why we want to use it here.
Upon opening default.frag find this line
vec4 baseColor = useTexture ? texture(tex0, texCoord) : meshColor;
Now it won't go too into depth about what is happening here. Just know that we are checking to see if we should use a texture or a flat colour.
So in order to use our default colour we should replace the meshColour part with vec4(DEFAULT_RED, DEFAULT_GREEN, DEFAULT_BLUE, 1.0f)
How upon loading into the game the default cube and any other mesh without a texture should be your colour (in this case red).
So how does this work?
If you have written a shader before you may have noticed the that version part is missing. Do not add it. This is because when the program loads the shaders it first appends the version then for every shader constant you have it does.
#define [key] [value]
in our case we get
#version 330 core
#define MAX_LIGHTS 8
#define DEFAULT_RED 1
#define DEFAULT_GREEN 0
#define DEFAULT_BLUE 0
at the top of every shader. We can also use these in engine itself, but we will come back to that later.
Now that you have an understanding of the shader-constants section lets move onto the next section defaults.
Click to see the full defaults config
{
    "defaults": {
        "version": "v1.0",
        "defaultWindowWidth": 1920,
        "defaultWindowHeight": 1080,

        "size": 256,
        "gridScale": 2.0,
        "heightScale": 80.0,
        "scale": 15.0,
        "octaves": 8,
        "persistence":0.5,
        "lacunarity": 2.0,

        "sphereStacks": 20,
        "sphereSlices": 20,

        "torusRingSegments": 40,
        "torusTubeSegments": 20,
        "torusRingRadius": 1.0,
        "torusTubeRadius": 0.3,

        "FOVdeg": 45.0,
        "nearPlane": 0.1,
        "farPlane": 10000.0,
        "sensitivity": 100.0,
        "speed": 1.0,
        "speedMultiplier": 50.0,

        "transformSpeed": 0.1
    }
}
If you knew nothing about json before this part should be somewhat clear to you now.
The defaults section stores all the information used by the engine at runtime.
Most of these won't be of much interest to you but some you might want to change are speedMultiplier, transformSpeed, sensitivity, and some of the terrain ones can be fun to play around with.
Over all the defaults section is pretty simple, but as of v1.0 you must ensure all of these fields exist, but nothing stops you from adding more which is what we will look at right now (:
Making our own
To make your own new defaults we should first draw our attention to include/defaults.h.
Click to see the full defaults file
//
// Created by halet on 9/5/2025.
//

#ifndef DEFAULTS_H
#define DEFAULTS_H

struct Defaults {
    unsigned int MAX_LIGHTS = 8;
    std::string version = "v1.0";
    unsigned int defaultWindowWidth = 1920;
    unsigned int defaultWindowHeight = 1080;

    //Terrain defaults
    unsigned int size = 256;
    float gridScale = 2.0f;
    float heightScale = 80.0f;
    float scale = 15.0f;
    int octaves = 8;
    float persistence = 0.5f;
    float lacunarity = 2.0f;

    //Sphere defaults
    int sphereSlices = 20;
    int sphereStacks = 20;

    //Torus defaults
    int torusRingSegments = 40;
    int torusTubeSegments = 20;
    float torusRingRadius = 1.0f;
    float torusTubeRadius = 0.3f;

    //Camera defaults
    float FOVdeg = 45.0f;
    float nearPlane = 0.1f;
    float farPlane = 10000.0f;
    float sensitivity = 100.0f;
    float speedMultiplier = 50.0f;

    //Input defaults
    float transformSpeed = 0.1f;
};

#endif //DEFAULTS_H
In this example we will add a new default for the caption at the top of the window.
To do this we can first add it to defaults.h in this case we can do:
std::string caption = "L-SIM ENGINE";
Now we can go into config.json and add:
{
    "caption": "THE BEST ENGINE EVER"
}
then we need to go into json.cpp and add:
configDefaults.caption = config["defaults"]["caption"].get<std::string>();
Finally, we can actually use this value by going into main.cpp and adding:
//Create a GLFW window
GLFWwindow* window = glfwCreateWindow(engineDefaults.defaultWindowWidth, engineDefaults.defaultWindowHeight, (engineDefaults.caption + " " + engineDefaults.version + " " + workingDir).c_str(), nullptr, nullptr);
replacing "L-SIM ENGINE" with engineDefaults.caption.
Now we will look at the final part which is loggers.
Here it is
{
  "loggers": {
    "stdInfo": {
      "hasTimeStamp": true,
      "colour": "INFO_COLOUR",
      "type": "INFO",
      "level": 0
    },
    "stdWarn": {
      "hasTimeStamp": true,
      "colour": "WARNING_COLOUR",
      "type": "WARNING",
      "level": 1
    },
    "stdError": {
      "hasTimeStamp": true,
      "colour": "ERROR_COLOUR",
      "type": "ERROR",
      "level": 2
    }
  }
}
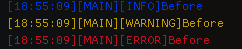
At the moment we have 3 loggers stdInfo, stdWarn, and stdError. While we can't change these names we can change some of the values.
First lets change the colours. To do this we simply replace colour field with how desired colour (colours will be covered in more details in the logger section).
Here we will change stdInfo from INFO_COLOUR to BRIGHT_YELLOW, stdWarn to BRIGHT_CYAN and stdError to MAGENTA.
This is what that will look like
BEFORE:
AFTER
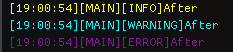
Pretty cool right.
We can also make a new logger. In this example we will make stdSuccess which we will use for when things in the engine succeed.
Here's what this could look like:
{
  "stdSuccess": {
    "hasTimeStamp": true,
    "colour": "BRIGHT_GREEN",
    "type": "SUCCESS",
    "level": 2
  }
}
Then to use this in our project we can do:
Log("stdSuccess", "Successfully made stdSuccess");
Which will look like this:

EDITOR'S NOTE: To understand what fields loggers have and what they can do refer to the loggers section.
Log System
One of the systems you will or at least should be using a lot in your projects in the logging system. In this part we will discuss:
- Components a logger can have
- How the logging system works
- How to use loggers.
Components of a logger
In L-SIM a log has 6 possible fields. In L-SIM you can pick and choose what fields you want, as logs are only required to have a message.
Below is the full list of fields in order from left to right:
- Colour
- Timestamp (HH:MM:SS by default)
- Module (A log can only have one module)
- Submodules (A log can have any number of submodules)
- Type (e.g., INFO, WARNING, ERROR)
- Message (required)
Here is an example of a log using every field:

Now let's go over each component in more detail.
Colour:
The L-SIM Engine uses the ANSI colour standard. This allows us to have coloured terminal outputs. Inside the engine however these are converted back into its rgb value to be used with ImGui.
Here is a list of every colour predefined by L-SIM:
#define BLACK "30m"
#define RED "31m"
#define GREEN "32m"
#define YELLOW "33m"
#define BLUE "34m"
#define MAGENTA "35m"
#define CYAN "36m"
#define WHITE "37m"

#define BRIGHT_BLACK "90m"
#define BRIGHT_RED "91m"
#define BRIGHT_GREEN "92m"
#define BRIGHT_YELLOW "93m"
#define BRIGHT_BLUE "94m"
#define BRIGHT_MAGENTA "95m"
#define BRIGHT_CYAN "96m"
#define BRIGHT_WHITE "97m"

#define ERROR_COLOUR "31m"
#define WARNING_COLOUR "33m"
#define INFO_COLOUR "34m"
EDITOR'S NOTE: For colours to work in CLion make sure that "Emulate Terminal" is enabled
Timestamp:
Timestamps show the time that the log was created. By default, this displays (Hour):(Minute):(Second). However, if you want to use a different timestamp, you can by using the SetCustomtimestamp function, but there will be more information about that in the "How to use loggers" section.
Module:
The module of a log is the main category of event that the log is from. It is recommended that the module of a log should be constant and denote the system that the log was called from. For example, [LOG], [MAIN], [GUI], [INPUTS], [MESH].
Submodules:
The submodules of a log are an array of subcategories that the is from. It is recommended that the submodules of a log should be used for dynamic values that can change throughout runtime or smaller sections of a module. For example. [COLLISION DETECTION], [PLAYER: 1][ROOM: 3][HEALTH: 80], [SERVER: AU][PING: 68ms]
Type:
The type of a log is the overall theme of that log. Examples of types could be: [INFO], [WARNING], [ERROR], [SUCCESS], [UNEXPECTED]
Message:
The message of a log is the mian reason for the log. Example of messages could be: [Successfully initialize client], [Player died], [QUITTING]
How loggers work and how to use them
I won't go too much into detail on how the logging system works. Just know that it uses a builder pattern.
Now to use a logger you can first create one in the config.json.
Then to use the logger in your file first add:
#include <include/utils/logging/log.h>
at the top of the file. Then add:
extern json config;

extern std::vector<Logger> logs;

static std::unordered_map<std::string, std::unique_ptr<Logger>> loggers;

static void Log(const std::string& key, const std::string& msg) {
    if (const auto it = loggers.find(key); it != loggers.end())
        (*it->second)(msg, logs);
}
This will get the logs for main. Technically you could also make the config yourself, but I would recommend doing it this way. This also adds a function at the top. While not strictly necessary this function makes using loggers cleaner.
Now I recommend adding an init function to your file you configure the module for your loggers.
Here is an example of an init function: this one is from the inputs class:
void Inputs::InitInputs() {
    JSONManager::LoadLoggers(config, loggers);

    // Ensure logger exists
    if (!loggers.count("stdInfo"))
        loggers["stdInfo"] = std::make_unique<Logger>();

    loggers["stdInfo"]->SetModule("INPUTS");
    loggers["stdWarn"]->SetModule("INPUTS");
    loggers["stdError"]->SetModule("INPUTS");

    Log("stdInfo", "Successfully initialized the input loggers");
}
How to log something you can do:
Log([your logger e.g., "stdInfo"], [your message])
And to add a new part to a logger you can do:
loggers[your logger]->[function to add field]([THING TO ADD]);
Here is the list of functions used to add components:
SetCustomTimeStamp(TimeFunc func) TimeFunc is any function returning std::string
HasTimeStamp() sets has time stamp component to true
SetColour(const std::string &c)
SetType(const std::string &t)
SetModule(const std::string &m
AddSubModules(const std::initializer_list<std::string>& sms) used like loggers[stdInfo]->AddSubModules({foo, bar})
File System
Welcome to the section on the file system of L-SIM.
The file system in contained inside of fileIO.h and fileIO.cpp.
In this section we will discuss.
- The order items are saved in
- how to add your own fields to be saved
Order of Items
The order of items as they are written and read from a file is as following:
- versionLen
- version (string)
- meshCount
for each mesh:
- nameLen
- name (string)
- verticesLen
- vertices (array)
- indicesLen
- indices (array)
- useTexture
- useNormalMap
- texturePathLen
- texturePath (string)
- specMapPathLen
- specMapPath (string)
- normalMapPathLen
- normalMapPath (string)
- if loading texIDs are generated based on the paths provided
- color
- meshID
- parentID
- position
- rotation
- scale
- modelMatrix
- if loading buffers (VAO, VBO, EBO) are created here and the mesh is configured in the hierarchy
End of loop
- lightCount
For each light:
- lightPos
- lightColor
- attenuationScale
End of loop
End
How to add a new field
Adding a field to be saved is quite straightforward.
To do this, in fileIO.cpp inside the saveToFile function add:
safeWrite([value to write to (as reference)], [size of field (in bytes)], [error message if fail]);
EDITOR'S NOTE: Remember that if you are writing a field with dynamic size e.g., name or vertices you will need to save the length as well
Reading a value is basically the same as writing one.
To do this, in fileIO.cpp inside the loadFromFile function add:
safeRead([value to write to (as reference)], [size of field (in bytes)], [error message if fail]);
Below is as example of writing a name value:
int nameLen = name.size();
//Write nameLen
safeWrite(&nameLen, sizeof(nameLen), "Failed to write name length");
//Write name
safeWrite(mesh->name.c_str(), nameLen * sizeof(char), "Failed to write name");
And here's reading:
int nameLen;
std::string name;
//Read nameLen
safeRead(&nameLen, sizeof(nameLen), "Failed to read name length");

name.resize(nameLen);

//Read name
safeRead(name.data(), nameLen * sizeof(char), "Failed to read name");
EDITOR'S NOTE: Remember to make sure fields are read and written in the same order and the field must be handled in both functions.
Other Systems
The logging system and fileIO system are the ones covered in the most detail, but there are a few more systems. For these systems we will just look at function definitions and properties. This is because this information is all you mainly need to understand these systems.
The systems we will look at are:
- Primitives
- Mesh
- Light
- Gui
- Inputs
- Scripts
Primitives
Functions:
Mesh primitives::GeneratePlane(const float tileScale);
Mesh primitives::GenerateCube(const float tileScale);
Mesh primitives::GeneratePyramid(const float tileScale);
Mesh primitives::GenerateSphere(const int stacks = 20, const int slices = 30, const float tileScale = 1);
Mesh primitives::GenerateTorus(const int ringSegments = 30, const int tubeSegments = 20, const float ringRadius = 0.3f, const float tubeRadius = 0.1f, const float tileScale = 1);
tileScale is the size of the texture. A tileScale of 10 will mean the texture will be repeated 10 times in each direction.
Adding primitive to a Scene:
Mesh mesh{GenerateSphere()};
scene.meshes.pushback(mesh);
Mesh System
Properties:
std::string name;

std::vector<GLfloat> vertices;
std::vector<GLuint> indices;

bool useTexture = false;
bool useNormalMap = false;

glm::vec4 color = glm::vec4(1.0f);

GLuint texId{};
std::string texturePath;

GLuint specMapId{};
std::string specMapPath;

GLuint normalMapId{};
std::string normalMapPath;

uint16_t meshID = 0;

VAO vao;

glm::vec3 position = glm::vec3(0.0f);
glm::vec3 rotation = glm::vec3(0.0f);
glm::vec3 scale    = glm::vec3(1.0f);

glm::mat4 modelMatrix = glm::mat4(1.0f);
Constructor
Mesh::Mesh(std::vector<GLfloat> &vertices, std::vector<GLuint> &indices);
Functions:
void Mesh::ApplyTransformations(); Called every frame
void Mesh::Draw(Shader& shader, Camera& camera); Called every frame
void Mesh::setupBuffers();
Examples:
Making a new mesh:
Mesh mesh {someVerticesArray, someIndicesArray};
Adding Mesh to Scene:
scene.meshes.push_back(mesh);
Deleting a Mesh From a Scene:
if (Gui::Node* nodeToDelete = Gui::FindNodeByMesh(Gui::root, mesh)) {
    Gui::DeleteNode(nodeToDelete); // This handles reparenting children
}

scene.meshes.erase(scene.meshes.begin() + meshIndex);
Changing a Property of a Mesh
mesh->property = foo;

//Or if alreay in a Scene

scene.meshes[meshIndex]->property = foo;

//Or if index unknown:

for (auto &mesh : scene.meshes){
    if (mesh->identifierProperty == knownValue){
        mesh->property == newValue
    }
}

//For Example indentifierProperty could be name and knownValue could be "Player"
Light System:
Properties:
glm::vec4 lightColor = glm::vec4(1.0f);
    glm::vec3 lightPos = glm::vec3(0.0f);
    float attenuationScale = 1.0f;
    float invScale = 1.0f / (attenuationScale + 0.001f); // Avoid division by zero
    float linear     = 0.09f * invScale;
    float quadratic  = 0.032f * invScale;
Examples:
Making a new light:
Light light;
Adding a Light to a Scene:
scene.lights.push_back(light);
Deleting a Light from a Scene:
scene.lights.erase(scene.lights.begin() + lightIndex);
Changing a property:
light->property = newValue;

//If in a scene

scene.lights[lightIndex]->property = newValue;
Note: As of v1.0 lights don't have names or any identifiers but v1.1 should fix this
Gui System
Most of Gui system is for the engine itself this system will eventually have Gui helper stuff to one day, but for now Begin, End, Console, and maybe Debug will we the only real useful ones for your own projects.
Functions:
void Gui::Initialize(GLFWwindow *window); Ran at the start of LSIM no need to use yourself
void Gui::Begin()
void Gui::End()
void Gui::CleanUp() Ran at the need of LSIM no need to run yourself
void Gui::Transform(const std::string &workingDir, const std::vector<std::unique_ptr<Mesh>>& meshes, std::vector<int> ¤tMeshes, int &selectedMeshType, int clickedMesh);
void Gui::Lighting(std::vector<Light> &lights, int ¤tLight);
void Gui::Debug(const double &mouseX, const double &mouseY)
void Gui::Console(int &selectedLogLevel, const std::vector<Logger> &logs);
Input System
Functions:
bool Inputs::isDown(const int key, const bool onlyOnPress, GLFWwindow* window);
void Inputs::MeshInputs(GLFWwindow* window, const Scene &scene, const int ¤tMesh, int &selectedMeshType, int &selectedMesh, glm::vec3 Orientation); For LSIM
void Inputs::LightInputs(Scene &scene, const int ¤tLight, GLFWwindow* window); For LSIM
void Inputs::IOInputs(GLFWwindow *window, Scene &scene, const std::string & workingDir); For LSIM
void Inputs::InputHandler(GLFWwindow* window, Scene &scene, const std::string &workingDir, const int ¤tMesh, const int ¤tLight, int &selectedMeshType, int &selectedMesh, glm::vec3 Orientation); For LSIM main function groups others
Examples:
Checking if Key is Down:
if (Inputs::isDown(GLFW_KEY_ANY, false, window)
    //Do something when key is down

//Or if you only want when pressed

if (Inputs::isDown(GLFW_KEY_ANY, true, window)
    //Do something when key is down
Texture System:
Functions:
unsigned int Texture::GetTexId(const char* path);
Examples:
Getting a TextureID:
unsigned int texture = Texture::GetTexId(pathToTexture);
Assigning a Texture to a Mesh;
mesh->texId = texture;

//Or if already in scene

scene.meshes[meshIndex]->texId = texture;
Programming Your Own Game
How that you have a solid understanding of LSIM and have made your scene you will want to program your own game.
To do this, First, in the scripts/ directory of your project
we recommend to create a CMakeLists.txt this way your ide will know about the LSIM files.
Here is a Simple CMakeLists.txt:
cmake_minimum_required(VERSION 3.31)
project(scripts)

set(CMAKE_CXX_STANDARD 20)

include_directories(
    Path to the LSIM source code (not the executable)
)

add_library(scripts STATIC
        Your Files
)
To add a new script go into scripts/ and make a new .cpp file. Then add:
#include <include/scene/scripts.h>

class YourClasName final : public Script {
    //Your code
}
REGISTER_SCRIPT(YourClassName) //Remember this!!!
Doing this creates your script and registers it with LSIM if you forget to register your script nothing will happen, and you will become very confused as to why. So remember it!
The LSIM Engine offers 2 default functions for scripts these being:
void Start() override;Called at the start of LSIMvoid Update(const float deltaTime) override;Called every frame
How you can go ahead and write your code, but before you do here are some useful externs you will probably need:
extern Scene scene; The scene used by LSIM remember to include include/scene/scene.h first
extern Camera camera; To work with the camera remember to include include/scene/camera.h first
extern GLFWwindow* window To work with the window and needed for inputs remember to include external/glfw/include/GLFW/glfw3.h first
extern json config To work with the config.json file remember to include include/utils/json.h first
extern Logger logs To work with the logging system remember to include include/utils/log.h first
There are also a few external libraries LSIM uses that you can to these are:
FastNoiseLite external/FastNoiseLite/FastNoiseLite.h
Glad external/glad/include/glad/glad.h
GLFW external/glfw/include/GLFW/glfw3.h
GLM external/glm/...
ImGui external/imgui/imgui.h
NlohmannJSON external/nlohmann/json.hpp
STB external/stb/stb_image.h
Finally, To build your game, you can use the "Run" button next to your project in the launcher. Note: this will assume that your LSIM source code in the parent directory of the LSIM executable.
Example Game:
Here is an example game made in the LSIM engine. This game is a simple procedural maze generator. Note that the code is not the best are there are some errors like Z-fighting it is mainly there to demonstrate how a game could be made not how a good game could be made (:
Maze Game
playerMovement.cpp
        #include <include/scene/script.h>
        #include <include/inputs/inputs.h>
        #include <include/geometry/mesh.h>
        #include <external/glfw/include/GLFW/glfw3.h>
        #include <external/glm/glm.hpp>
        #include <external/glm/gtc/matrix_transform.hpp>
        #include <external/glm/gtc/type_ptr.hpp>
        #include <include/scene/scene.h>


        extern Scene scene;
        extern GLFWwindow* window;
        extern Camera camera;

        class PlayerMovement final : public Script {
        Inputs inputs;
        float speed = 5.f;

        double lastMouseX = 0.0;
        double lastMouseY = 0.0;
        bool firstMouseMove = true;

        float yaw   = -90.f;
        float pitch = 0.f;

        float mouseSensitivity = 0.2f;

        bool moving = false;

        static void CheckCollision(float x, float z, float sx, float sz) {
            auto testAABB = [&](glm::vec3 pos, glm::vec3 scale) {
                if (scale == glm::vec3(0.0f)) return; // safety guard

                const float pxMin = x - sx / 2;
                const float pxMax = x + sx / 2;
                const float pzMin = z - sz / 2;
                const float pzMax = z + sz / 2;

                const float mxMin = pos.x - scale.x / 2.0f;
                const float mxMax = pos.x + scale.x / 2.0f;
                const float mzMin = pos.z - scale.z / 2.0f;
                const float mzMax = pos.z + scale.z / 2.0f;

                float overlapX = std::min(pxMax, mxMax) - std::max(pxMin, mxMin);
                float overlapZ = std::min(pzMax, mzMax) - std::max(pzMin, mzMin);

                if (overlapX > 0 && overlapZ > 0) {
                    if (overlapX < overlapZ) {
                        camera.Position.x += (camera.Position.x < pos.x ? -overlapX : overlapX);
                    } else {
                        camera.Position.z += (camera.Position.z < pos.z ? -overlapZ : overlapZ);
                    }
                }
            };

            for (const auto &meshPtr : scene.meshes) {
                if (meshPtr->name == "Ground") continue;
                Mesh &mesh = *meshPtr;
                testAABB(mesh.position, mesh.scale);
            }

            for (const auto &instanced : scene.instancedMeshes) {
                for (const auto &mat : instanced->instances) {
                    glm::vec3 pos = glm::vec3(mat[3]);
                    glm::vec3 scale = glm::vec3(glm::length(mat[0]),
                                                glm::length(mat[1]),
                                                glm::length(mat[2]));

                    testAABB(pos, scale);
                }
            }
        }


        void HandleInputs(float deltaTime) {
            // local space
            glm::vec3 forward = glm::normalize(glm::vec3(camera.Orientation.x, 0.0f, camera.Orientation.z));
            glm::vec3 right   = glm::normalize(glm::cross(forward, glm::vec3(0,1,0)));

            if (inputs.isDown(GLFW_KEY_W, false, window))
                camera.Position += forward * speed * deltaTime;
            if (inputs.isDown(GLFW_KEY_S, false, window))
                camera.Position -= forward * speed * deltaTime;
            if (inputs.isDown(GLFW_KEY_D, false, window))
                camera.Position += right * speed * deltaTime;
            if (inputs.isDown(GLFW_KEY_A, false, window))
                camera.Position -= right * speed * deltaTime;
            if (inputs.isDown(GLFW_KEY_LEFT_SHIFT, false, window))
                speed = 10.f;
            else
                speed = 5.f;

            if (inputs.isDown(GLFW_KEY_W, false, window)
                || inputs.isDown(GLFW_KEY_S, false, window)
                || inputs.isDown(GLFW_KEY_A, false, window)
                || inputs.isDown(GLFW_KEY_D, false, window)) {
                moving = true;
            } else moving = false;
        }

        void Start() override {
            glfwSetInputMode(window, GLFW_CURSOR, GLFW_CURSOR_DISABLED);
        }

        void Update(float deltaTime) override {
            // Get current mouse position
            double mouseX, mouseY;
            glfwGetCursorPos(window, &mouseX, &mouseY);

            if (firstMouseMove) {
                lastMouseX = mouseX;
                lastMouseY = mouseY;
                firstMouseMove = false;
            }

            const double deltaX = mouseX - lastMouseX;
            const double deltaY = lastMouseY - mouseY;

            lastMouseX = mouseX;
            lastMouseY = mouseY;

            yaw   += static_cast<float>(deltaX) * mouseSensitivity;
            pitch += static_cast<float>(deltaY) * mouseSensitivity;

            if (pitch > 89.f) pitch = 89.f;
            if (pitch < -89.f) pitch = -89.f;

            glm::vec3 dir;
            dir.x = cos(glm::radians(yaw)) * cos(glm::radians(pitch));
            dir.y = sin(glm::radians(pitch));
            dir.z = sin(glm::radians(yaw)) * cos(glm::radians(pitch));
            camera.Orientation = glm::normalize(dir);

            HandleInputs(deltaTime);

            const float amplitude = moving ? 0.05f : 0.01f;
            camera.Position.y = 1.8 + (sin(glfwGetTime() * speed) * amplitude);

            scene.lights[0].lightPos = camera.Position;

            CheckCollision(camera.Position.x, camera.Position.z, 1, 1);
        }
    };

    REGISTER_SCRIPT(PlayerMovement)
mazeGen.cpp
    //
    // Created by halet on 9/26/2025.
    //

    #include <filesystem>
    #include <iostream>
    #include <random>
    #include <external/glm/vec3.hpp>
    #include <include/scene/script.h>
    #include <include/geometry/primitives.h>
    #include <include/geometry/mesh.h>
    #include <include/scene/scene.h>
    #include <include/utils/texture.h>
    #include <external/glad/include/glad/glad.h>
    #include <external/glm/ext/matrix_transform.hpp>

    extern Scene scene;
    extern std::string workingDir;
    class MazeGen final : public Script {
    int mazeSize = 50;
    int cellSize = 5;

        struct Cell {
            bool visited = false;

            bool top = true;
            bool bottom = true;
            bool left = true;
            bool right = true;
        };

        std::vector<std::vector<Cell>> maze;

        std::random_device rd;
        std::mt19937 g{rd()};

        GLuint brickwall{};
        GLuint brickwallNormal{};

        std::unique_ptr<Scene::InstancedMesh> wallBatch;

        std::vector<std::pair<int, int>> GetNeighbours(int x, int y) const {
            std::vector<std::pair<int, int>> neighbours;

            if (x > 0) neighbours.push_back({x - 1, y});
            if (x < mazeSize - 1) neighbours.push_back({x + 1, y});
            if (y > 0) neighbours.push_back({x, y - 1});
            if (y < mazeSize - 1) neighbours.push_back({x, y + 1});

            return neighbours;
        }

        void RemoveWallsBetween (const int x, const int y, const int nx, const int ny) {
            if (nx == x + 1) maze[x][y].right = false, maze[nx][ny].left = false;
            else if (nx == x - 1) maze[x][y].left = false, maze[nx][ny].right = false;
            else if (ny == y + 1) maze[x][y].bottom = false, maze[nx][ny].top = false;
            else if (ny == y - 1) maze[x][y].top = false, maze[nx][ny].bottom = false;
        }

        void DFS (const int x, const int y) {
            maze[x][y].visited = true;

            auto neighbours = GetNeighbours(x, y);
            std::shuffle(neighbours.begin(), neighbours.end(), g);

            for (auto [nx, ny] : neighbours) {
                if (!maze[nx][ny].visited) {
                    RemoveWallsBetween(x, y, nx, ny);
                    DFS(nx, ny);
                }
            }
        }

        void BuildWall(const float x, const float z, float sx, float sz, const bool vertical) {
            glm::mat4 model(1.0);

            if (vertical)
                sz += sx;

            glm::vec3 position(x, 2.5f, z);
            glm::vec3 scale(sx, 5.0f, sz);

            model = glm::translate(model, position);
            model = glm::scale(model, scale);

            wallBatch->instances.push_back(model);
        }

        void GenerateMaze() {
            for (int x = 0; x < mazeSize; ++x) {
                for (int y = 0; y < mazeSize; ++y) {
                    constexpr float wallThickness = 1.f;
                    const float baseX = x * cellSize;
                    const float baseZ = y * cellSize;
                    const auto& cell = maze[x][y];

                    const float halfCell = cellSize / 2.0f;

                    if (cell.top)    BuildWall(baseX, baseZ - halfCell, cellSize, wallThickness, false);
                    if (cell.bottom) BuildWall(baseX, baseZ + halfCell, cellSize, wallThickness, false);
                    if (cell.left)  BuildWall(baseX - halfCell, baseZ, wallThickness, cellSize, true);
                    if (cell.right) BuildWall(baseX + halfCell, baseZ, wallThickness, cellSize, true);
                }
            }

        }

        void Start() override {
            brickwall = Texture::GetTexId((workingDir + "/resources/brickwall.jpg").c_str());
            brickwallNormal = Texture::GetTexId((workingDir + "/resources/brickwall_normal.jpg").c_str());

            wallBatch = std::make_unique<Scene::InstancedMesh>();
            wallBatch->mesh = std::make_unique<Mesh>(primitives::GenerateCube(1));
            wallBatch->mesh->useTexture = true;
            wallBatch->mesh->useNormalMap = true;
            wallBatch->mesh->texId = brickwall;
            wallBatch->mesh->normalMapId = brickwallNormal;

            //Make ground plane
            auto ground = std::make_unique<Mesh>(primitives::GeneratePlane(mazeSize));
            ground->name = "Ground";
            ground->scale *= mazeSize * cellSize;
            ground->position = glm::vec3(mazeSize * cellSize / 2 - 2.5, 0, mazeSize * cellSize / 2 - 2.5);
            ground->useTexture = true;
            ground->texId = Texture::GetTexId((workingDir + "/resources/grass.jpg").c_str());
            scene.meshes.push_back(std::move(ground));

            maze = std::vector(mazeSize, std::vector<Cell>(mazeSize));
            DFS(1, 1);
            maze[0][0].top = false;
            maze[mazeSize-1][mazeSize-1].bottom = false;
            GenerateMaze();

            wallBatch->UploadInstances();

            scene.instancedMeshes.push_back(std::move(wallBatch));
        }
    };
    REGISTER_SCRIPT(MazeGen)
The End?
Congratulations! You have made it to the end of the documentation for L-SIM ENGINE v1.0. With your new-found skills you should be able to create somewhat complex scenes with your only limitation being the fact the engine is new and not yet as feature-rich as in the future. However, this is only the first release, and you can expect improved versions in the following months allowing you to take your skills to an even higher level. For information on features projected for the next version the L-SIM ENGINE repo is the place to go.
Anyway, I hope you enjoy using the engine and see it as a promising engine for development in the near future.
Goodbye (: